You can select a topic from this diagram:
You must set up a Launch Configuration before you can run or debug a program.
In this chapter:
To run or debug programs with the IDE, you must set up a launch configuration to define which programs to launch, the command-line options to use, and what values to use for environment variables. The configurations also define which special tools to run with your program (e.g. the Code Coverage tool, the Application Profiler, Kernel Logging, and the Memory Analysis tool).
The IDE saves your launch configurations so you can quickly reproduce the particular execution conditions of a setup you've done before, no matter how complicated.
Each launch configuration specifies a single program running on a single target. If you want to run your program on a different target, you can copy and modify an existing launch configuration. And you can use the same configuration for both running and debugging your program, provided that your options are the same.
The IDE supports these default types of launch configurations:
- C/C++ QNX QConn (IP) -- (Run and Debug)
- If you're connecting to your target machine by IP, select this configuration (even if your host machine is also your target). You'll have full debugger control and can use the Application Profiler, Memory Trace, and Code Coverage tools. Your target must be running qconn.
- C/C++ QNX Attach to Remote Process via QConn (IP) -- (Profile, Run, and Debug)
- If you're connecting to your target machine by IP, select this configuration. This option let's you use the Application Profiler tool for profiling. Your target must be running qconn.
- C/C++ QNX PDebug (Serial) -- (Debug)
- If you can access your target only via a serial connection, select this configuration. Rather than use qconn, the IDE uses the serial capabilities of gdb and pdebug directly. This option is available only when you select
Debug.
- C/C++ Local Application -- (Run and Debug)
- If you're developing on a self-hosted system, you may create a C/C++ Local launch configuration. You don't need to use qconn; the IDE launches your program through gdb.
- C/C++ Postmortem debugger -- (Debug)
- If your program produced a dump file (via the dumper utility) when it faulted, you can examine the state of your program by loading it into the postmortem debugger. This option is available only when you select Debug. When you debug, you're prompted to select a dump file.
- GDB Hardware Debugging -- (Debug)
- If you want to connect to hardware debugging devices that support an integration with GDB, such as JTAG. In addition, this launch configuration lets you specify:
- commands that get executed when GDB connects to the device
- an image to load on the target
- commands that configure the target for execution
- PhAB Application
- If you wish to run a PhAB application, follow the steps for creating a C/C++ QNX QConn (IP) launch configuration.
The main difference between the C/C++ QNX QConn (IP) launch configurations and the other types is that the C/C++ QNX QConn (IP) type supports the runtime analysis tools (QNX System Profiler and the QNX Memory Trace).
You can use the same launch configuration to run or debug a program:
The Run and Debug menu items appear in the C/C++ perspective by default, but they may not appear in all perspectives. You'll need the menu item to set up a launch configuration.
To include the menu item into your current perspective:
- From the main menu, select .
- Select the Commands tab.
- Select the Launch checkbox in the Available command groups list if it is not currently selected for you.
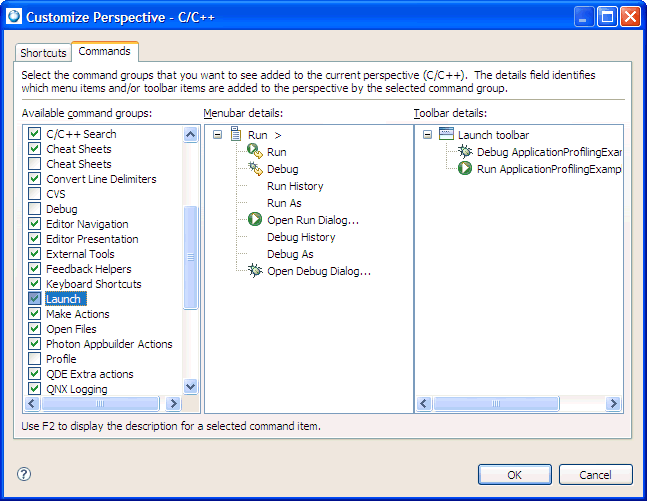
- Click OK.
To create a launch configuration to debug a program for the first time:
- In the C/C++ Projects or Navigator view, select your project.
- Select .
- Select a launch configuration type:
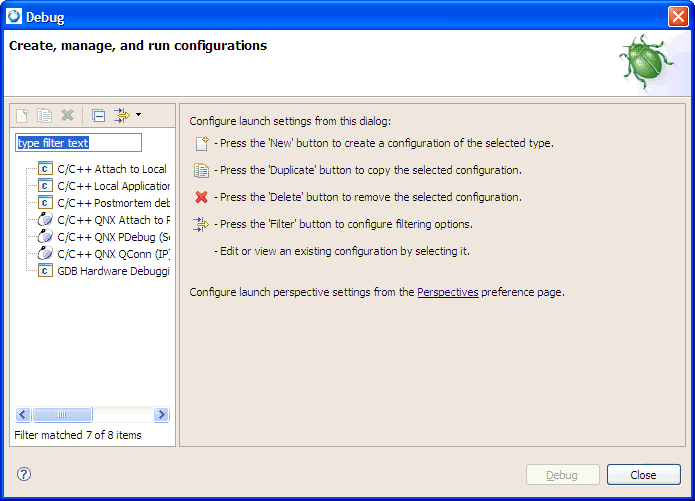
Typically, if you're connecting to your target via IP, you can select C/C++ QNX QConn (IP). If not, see the "Types of launch configurations" section in this chapter before deciding.
 |
You can't create a local debug session with the QNX GDB Debugger. This debugger is available only on qconn for postmortem debugging. |
- Click the New button.
The dialog shows the various tabs for the launch configuration.
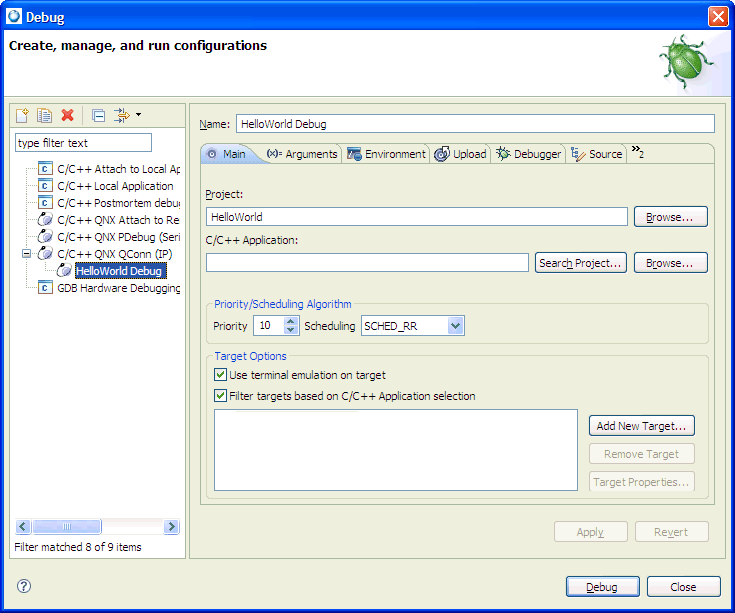
- In the Name field, type a name for the configuration.
- Fill in the details in the various tabs. For details about each tab, see the "Setting execution options" section in this chapter.
- Click Debug.
Now, you can run (launch) and debug your program.
|
You can also use the Debug As menu item to conveniently select a particular launch configuration and launch and existing debug configuration:
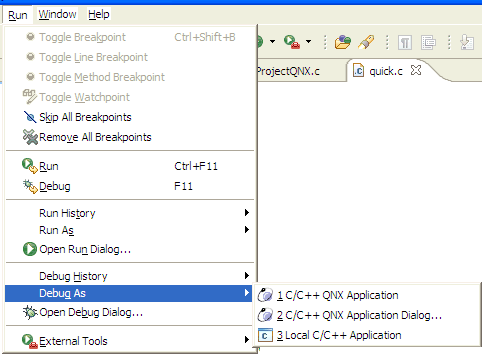
|
When you configure a program to run, you should also configure it to debug as well.
|
There are fewer options for running programs than for debugging. |
-
To run a program the first time:
-
Repeat the procedure for debugging a program (see "Debugging a program the first time"), with the following changes:
|
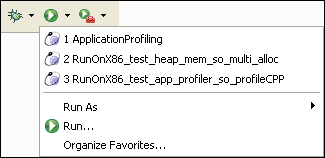
You can also use the Run As menu item to conveniently select a particular launch configuration:

|
The IDE also lets you run a program without creating a launch configuration, but the program's output doesn't
appear in the Console view.
To run a program without using the launcher:
- After building the program, drag the executable from the
Project Explorer view to a target listed in the Target File System
Navigator view. (To learn more about the view, see the "Moving files between
the host and target" in the Building OS and
Flash Images chapter.)
- In the Target File System Navigator view, right-click your file
and select Run. When the dialog appears, click
OK. Your program runs.
Once you've created a launch configuration, running or
debugging a program is as easy as selecting that
configuration. You can do this in several ways:
To debug or run a program that you've created a launch configuration for:
- From the main menu, select
or
.
- In the left pane, select the launch configuration you created when you first ran or debugged your program.
- Click Debug or Run.
If you have a program that you launch frequently, you can
add it to the Debug or Run dropdown menu
so you can launch it quickly.
|
To use this method, you must have selected Display in
favorites when you first created your launch
configuration. If you didn't, edit the Display in
favorites menu option under the Common tab. See "Setting execution options" in this chapter. |
To debug or run a program using your favorites list:
- Do one of the following:
- Run: From the main menu, select to show a submenu of the recent history of launch configurations launched in Run mode.
- Run: Click the dropdown menu (
 ) part of the run menu button set (
 ).
).
- Debug: From the main menu, select to show a submenu of the recent history of launch configurations launched in Debug mode.
- Debug: Click the dropdown menu () part of the debug menu button set (
 ).
).
- Click Organize Favorites... and select all the launch configurations you want to specify as favorites. They will appear at the top of the menu:
- Select your launch configuration from the list of favorites.
-
To relaunch the last program you ran or debugged:
-
Press F11 or click the dropdown button () beside the Debug or Run icon, then select your launch configuration.
Depending on the type of launch configuration you specify, the Launch Configurations dialog has several tabs:
|
All of these tabs appear when you select the C/C++ QNX
QConn (IP) type of launch configuration; only some tabs
appear when you select the other types. |
This tab lets you specify the project and the executable
that you want to run or debug. The IDE might fill in some of
the fields for you:
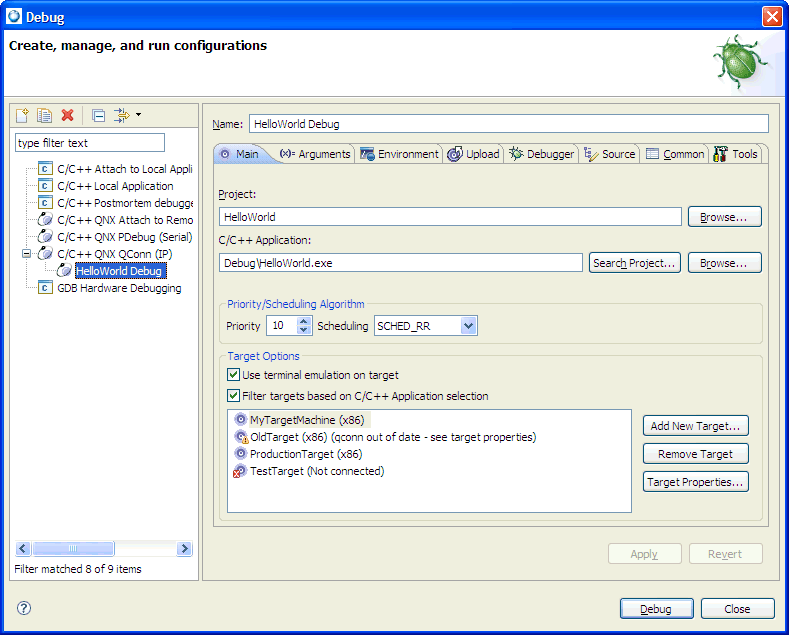
The Main tab in the Launch Configuration dialog.
Different fields appear in the Main tab, depending on the type of configuration you're creating. Here are descriptions
of all the fields:
- Project
- Type the name of the project that contains the
executable you want to launch. You may also locate a project
by clicking Browse.... You can create or edit launch
configurations only for open projects.
- C/C++ Application
- Type the relative path of the executable's project
directory (e.g. x86/o/Test1_x86). For QNX
projects, an executable with a suffix of _g
indicates it was compiled for debugging. You may also locate
an available executable by clicking Search Project....
- Priority/Scheduling Algorithm
- Lets you specify the priority and scheduling for threads. Each thread can be given a priority and will be able to access the CPU based on that priority. If a low-priority thread and a high-priority thread both want to run, then the high-priority thread will be the one that gets to run. If a low-priority thread is currently running and then a high-priority thread suddenly wants to run, then the high-priority thread will take over the CPU and run, thereby preempting the low-priority thread.
For the scheduling options:
- SCHED_FIFO -- a thread is allowed to consume CPU for as long as it wants. This means that if that thread is performing a very long mathematical calculation, and no other thread of a higher priority is ready, that thread could potentially run forever. If another thread has the same priority, it is locked out as well.
- SCHED_OTHER -- provides a limit on the execution time of a thread within a given period of time.
- SCHED_RR -- is identical to SCHED_FIFO, except that the thread will not run forever if there's another thread at the same priority; it runs only for a system-defined timeslice.
- Target Options
- If you want the IDE to create a "pseudo terminal" on the target
that sends terminal output to the Console view on a
line-by-line basis, then deselect (uncheck) the Use terminal emulation on target option.
To use terminal emulation, your target must be running the devc-pty manager.
- If you want to filter out platforms that don't match
your selected executable, then set the Filter targets
based on C/C++ Application selection on. For example,
if you've chosen a program compiled for PowerPC, you'll see only
PowerPC targets and offline targets.
- Select a target from the available list. If you haven't
created a target, click Add New Target.
For more information about creating a target, see the Common Wizards Reference chapter.
- General Options
- If you're creating a C/C++ QNX PDebug (Serial)
launch configuration, then you'll see the Stop in
main option, which is selected by default. This means
that after you start the debugger, it stops in
main() and waits for your input.
|
For serial debugging, make sure that the pseudo-terminal communications manager (devc-pty) is running on your target. |
- Serial Port Options
- Here you can specify the serial port (e.g.
COM1 for Windows hosts) and the baud rate,
which you select from the dropdown list.
This tab lets you specify the arguments your program uses
and the directory where it runs.
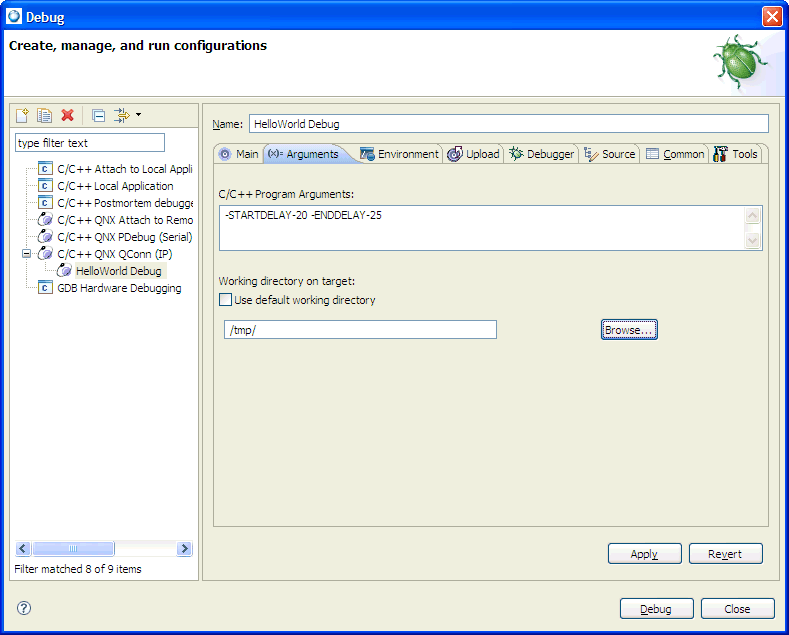
The Arguments tab in the Launch Configurations dialog.
- C/C++ Program Arguments
- Enter the arguments that you want to pass on the command
line. For example, if you want to send the equivalent of
myProgram -v -L 7, type -v -L 7 in
this field. You can put -v and -L 7 on
separate lines because the IDE automatically strings the
entire contents together.
- Working directory on target
- The option Use default working directory is set
on by default. This means the executable runs in the
/tmp directory on your target. If you turn
off this option, you can click Browse... to locate
a different directory.
The Environment tab lets you set the environment variables
and values to use when the program launches. For example, if
you want to set the environment variable named
PHOTON to the value
/dev/photon_2 when you run your program, use
this tab. Click New to add an environment variable.
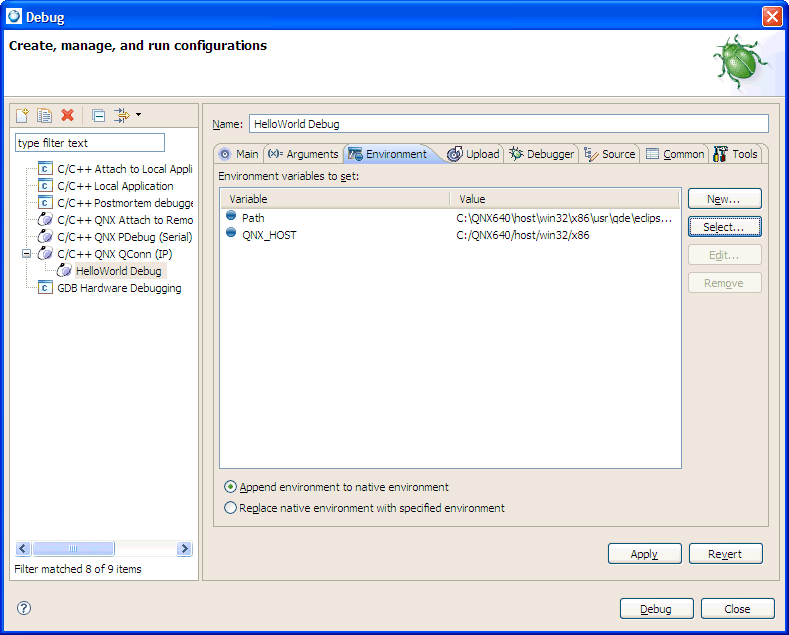
The Environments tab in the Launch Configurations dialog.
The Upload tab lets you tell the IDE whether to transfer
an executable from the host machine to the target, or to
select one that already resides on the target. You use this tab if libraries have to be uploaded every time an application runs.
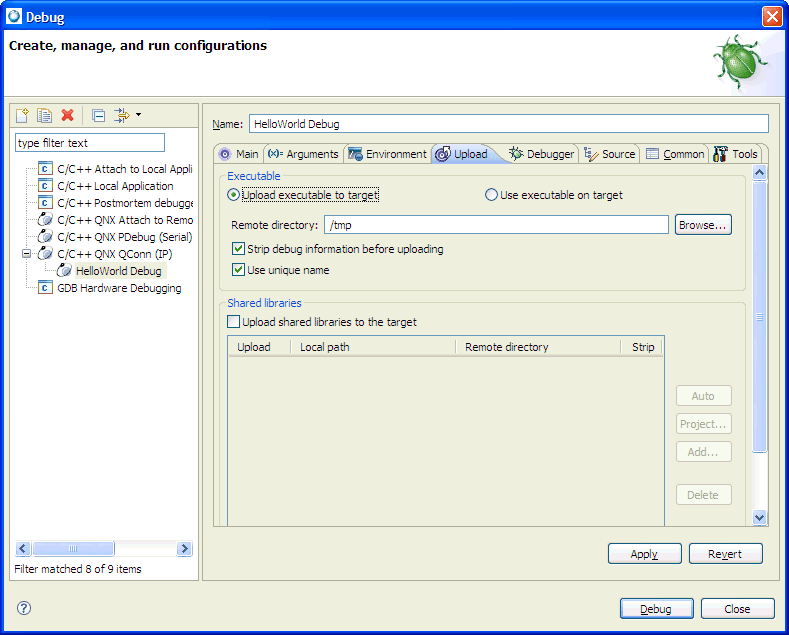
The Upload tab in the Launch Configurations dialog.
- Executable
- If you select Upload executable to target,
the IDE sends a clean copy of the executable every time you
run or debug; otherwise, select Use executable on target and the IDE uses the existing version of the executable on the target.
If you select the Use executable on target option,
you'll need to specify a remote directory for the executable.
The Remote directory field shows the
remote directory of /tmp on your target. You can also click Browse... to locate a directory.
By default, the Strip debug information before uploading
option is selected. Deselect this option if you don't want
the IDE to strip the executable you're uploading to your
target.
By default, the Use unique name option is selected.
This means that the IDE makes your executable's filename
unique (e.g. by appending a number) during each download session.
- Extra libraries
- The Extra libraries area lets you select the shared
libraries your program needs. If you click the Auto
button, the IDE attempts to automatically find the libraries
needed. If you click From project, the IDE
looks in your workspace for libraries.
You also have the option of not downloading any shared
libraries to your target.
- Shared library paths
- The IDE doesn't know the location of your shared library
paths, so you must specify the directory containing any
libraries that you wish to profile.
By default, the IDE removes the files it has downloaded
after each session. If you don't want the IDE to
"clean up" after itself, then deselect the
Remove downloaded components after session option.
The Debugger tab lets you configure how your debugger works. To debug your application, you must use executables that are compiled for debugging. These executables contain additional debug information that let the debugger make direct associations between the source code, and binaries generated from the source.
These options on the Debugger tab change, depending
on the type of debugger you select:

The Debugger tab in the Launch Configurations dialog.
|
The settings in the Debugger tab affect your executable only when you debug it, not when you run it. |
- Debugger
- The debugger dropdown list includes the available
debuggers for the selected launch-configuration type. The
list also varies depending on whether you're debugging
a remote or a local target.
- Stop on startup at
- By default, this option is selected and the default location is main(). If you deselect it,
the program runs until you interrupt it manually, or until it encounters a breakpoint.
- Advanced
- Click to show the Advanced Options dialog:
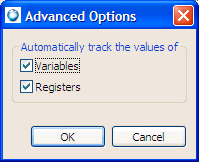
Enable these options if you want the system to track
every variable and register as you step through your program.
Disable the Variables option to manually select
individual variables to work with in the Variables view in the
debugger (see the Debugging Your Programs chapter). Disabling the
Registers option works the same way for the Registers view.
|
If you choose to track all the variables or registers, your program's
performance may decrease. |
- Verbose console mode
- For GDB, select Verbose console mode to see all of the commands sent to GDB, and all of the responses returned from GDB.
- Use full path to set breakpoints
- Set breakpoints if you have many files with the same base name in the project. When file names are identical but their paths are different, setting this option ensures that breakpoints are set for the appropriate file, as expected.
The Main tab and Shared libraries tabs let you specify specific options for the debugger that you selected.
- GDB command file
- Specify a file for running gdb
using the -command option (see the Utilities Reference).
You can use the pane to select specific libraries or use the
Auto button to have the IDE attempt to select your
libraries.
- Verbose console mode
- See all of the commands sent to GDB, and all of the responses returned from GDB.
- Load shared library symbols automatically
- Watch line-by-line
stepping of library functions in the C/C++ editor. You may
want to deselect this option if your target doesn't have
much memory; the library symbols consume RAM on the target.
- Use full path to set breakpoints
- Set breakpoints if you have many files with the same base name in the project.
- Stop on shared library events
- Choose this option if you want the debugger to break
automatically when a shared library or DLL is loaded or
unloaded.
The Source tab lets you specify where the debugger should
look for source files. By default, the debugger uses the
source from your project in your workspace, but you can
specify source from other locations (e.g. from a central
repository).
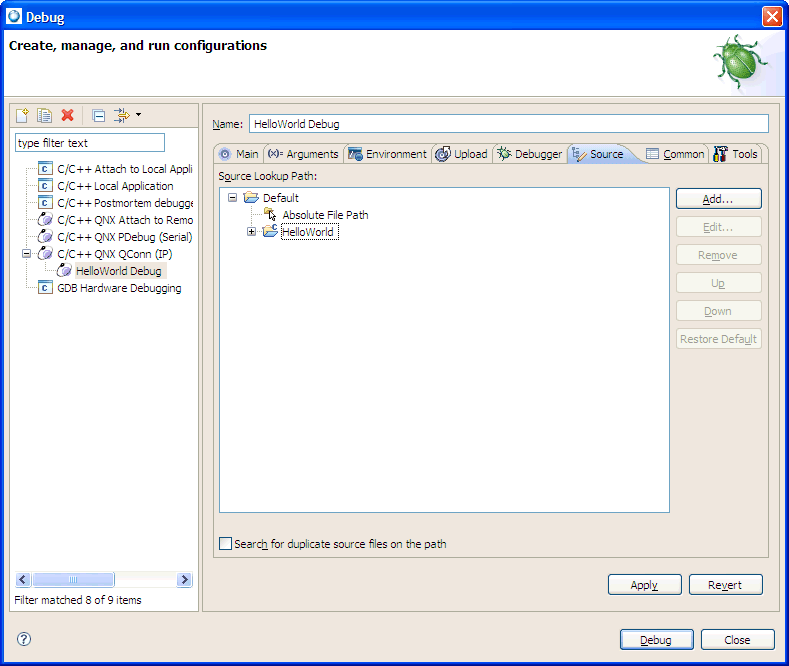
The Source tab in the Launch Configurations dialog.
To specify a new source location:
- On the Source tab, click Add.... The Add Source
Location dialog appears. You may choose to add the source
either from your workspace or elsewhere:
- If you wish to add source from your workspace, select
Workspace, or from a specific folder select Workspace Folder and then click OK.
- If you wish to add source from outside your workspace,
select File System Directory, and click OK. Type the path to your source in the Select location
directory field or use the Browse button to
locate your source.
If you want to specify a mapping between directories, choose the
Associate with option and enter the directory in the
available field. For example, if your program was built in
the C:/source1 directory and the source is
available in the C:/source2 directory, enter
C:/source2 in the first field and associate
it with C:/source1 using the second field.
If you want the IDE to recurse through the subdirectories to find the source, then choose the Search
subfolders option.
- Click Finish. The IDE adds the new source location.
The Common tab lets you define where the launch
configuration is stored, how you access it, and what
perspective you change to when you launch.
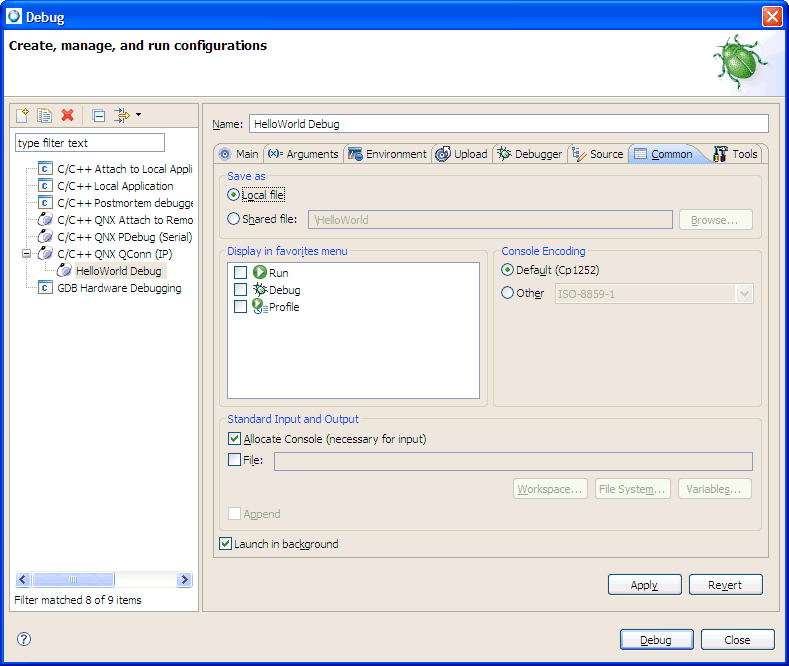
The Common tab in the Launch Configurations dialog.
- Type of launch configuration
- When you create a launch configuration, the IDE saves it
as a .launch file. If you select
Local, the IDE stores the configuration in one of
its own plugin directories. If you select Shared file,
you can save it in a location you specify (such as in your
project). Saving as a shared file lets you commit the
.launch file to source control, such as CVS or Subversion, which allows others to
run the program using the same configuration.
- Display in favorites
- You can have your launch configuration displayed when
you click the Run or Debug dropdown menus in the toolbar. To
do so, check the Run or Debug options under the Display in
favorites menu heading.
- Launch in background
- This is enabled by default, letting the IDE launch applications in the
background. This lets you continue to use the IDE while waiting for a
large application to be transferred to the target.
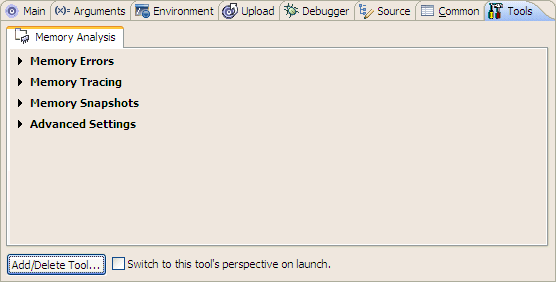
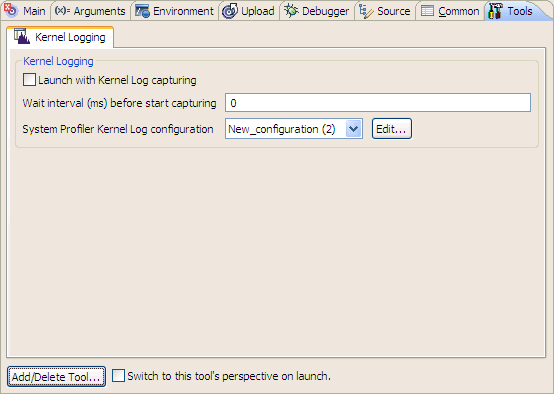
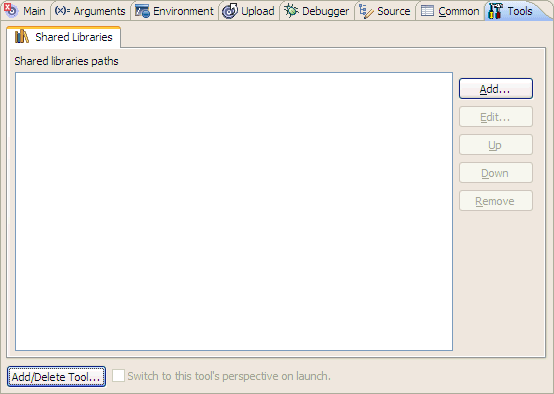
The Tools tab lets you add runtime analysis tools to the
launch. To do this, click the Add/Delete Tool button
at the bottom of the tab:

The Tools tab in the Launch Configurations dialog.
You can add the following tools (some launch options affect which tools are available):
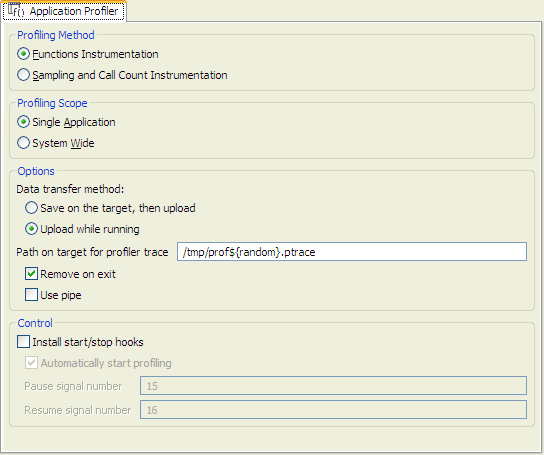
- Application Profiler
- Lets you count how many times functions are called, who
called which functions, and so on. For more information about this tool, see the
Profiling Your Application
chapter.
- Memory Analysis
- Lets you track memory errors. For more information about this tool, see the Finding Memory Errors chapter.
- Kernel Logging
- Lets you perform a system wide profile to monitor all processes that execute on a
specific set of CPUs.
- Shared Libraries
- Lets you add paths to shared library references.
- Code Coverage
- Lets you measure what parts of your program have run,
and what parts still need to be tested. For more information about this
tool, see the Code Coverage
chapter.
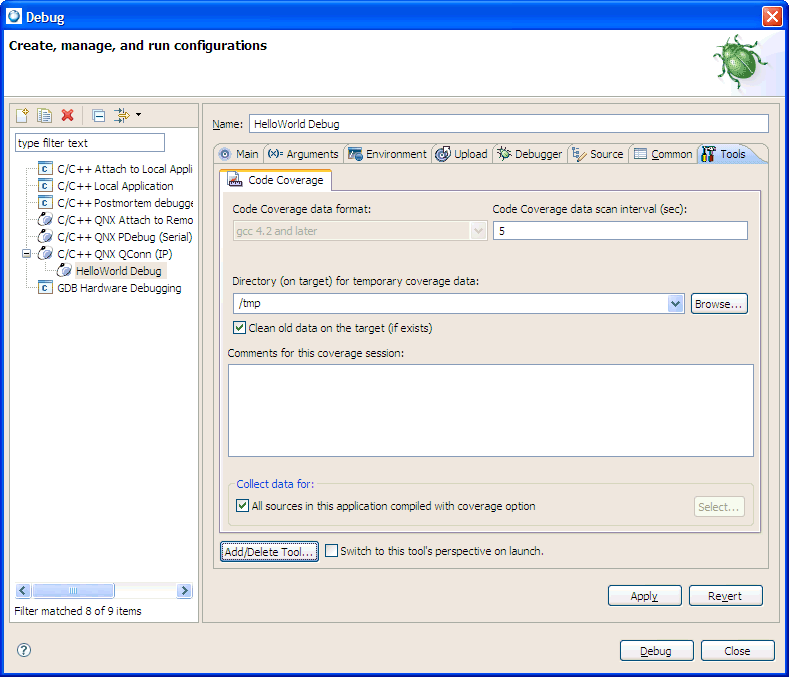
If you want the IDE to open the appropriate perspective for
the tool during the launch, then check Switch to this
tool's perspective on launch.
![[Previous]](prev.gif)
![[Contents]](contents.gif)
![[Index]](keyword_index.gif)
![[Next]](next.gif)
